這是Jimmy他自己用樂高NXT積木做的直昇機,因為做好一陣子了他想拆掉,重組新的積木作品,希望我拍照下來做紀念,剛好拿新入手的WebCam幫Jimmy拍段解說影片
Jimmy有好一陣子沒有學寫機器人程式了,前些時候沒下雨就帶他去游泳或打籃球,這陣子則是做做IXL網站上的數學題或是陪他讀簡單的兒童英文故事,沒空陪他時,他自己會去玩摩爾莊園
這是Jimmy他自己用樂高NXT積木做的直昇機,因為做好一陣子了他想拆掉,重組新的積木作品,希望我拍照下來做紀念,剛好拿新入手的WebCam幫Jimmy拍段解說影片
Jimmy有好一陣子沒有學寫機器人程式了,前些時候沒下雨就帶他去游泳或打籃球,這陣子則是做做IXL網站上的數學題或是陪他讀簡單的兒童英文故事,沒空陪他時,他自己會去玩摩爾莊園
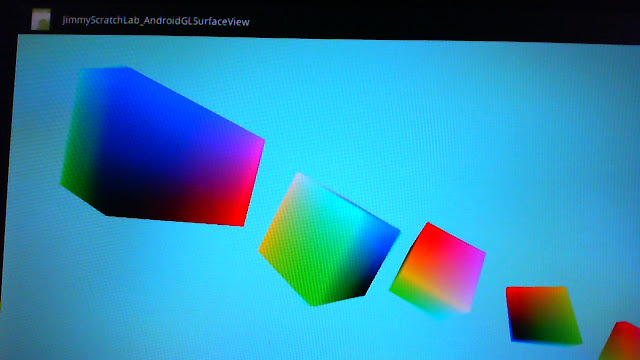 |
| 寄件者 scratchlab |
Jimmy's papa參考網路上一堆Android OpenGL ES的教學文章,寫了個小範例,感覺起來好像沒有像寫Flash的PV3D or Away3D那麼便利,有空再查看看有沒有方便的工具可以從Blender自動產生相關的Mesh類別
import android.app.Activity;
import android.content.Context;
import android.opengl.GLSurfaceView;
import android.os.Bundle;
import android.view.MotionEvent;

public class AndroidGLSurfaceViewActivity extends Activity {

 private MyGLSurfaceView myGLSurfaceView;

    /** Called when the activity is first created. */
    @Override
    public void onCreate(Bundle savedInstanceState) {
        super.onCreate(savedInstanceState);

        myGLSurfaceView = new MyGLSurfaceView(this);
        setContentView(myGLSurfaceView);
    }

 @Override
 protected void onResume() {

  super.onResume();
  myGLSurfaceView.onResume();
 }

 @Override
 protected void onPause() {

  super.onPause();
  myGLSurfaceView.onPause();
 }

 class MyGLSurfaceView extends GLSurfaceView{

  CubeRenderer myRenderer;


  public MyGLSurfaceView(Context context) {
   super(context);
   // TODO Auto-generated constructor stub
         myRenderer = new CubeRenderer(false);
         setRenderer(myRenderer);
  }

  @Override
  public boolean onTouchEvent(final MotionEvent event) {
   // TODO Auto-generated method stub
   queueEvent(new Runnable(){

    public void run() {
     myRenderer.setColor(event.getX()/getWidth(),
       event.getY()/getHeight(), 1.0f);
    }});
   return true;
  }
 }

}
import javax.microedition.khronos.egl.EGLConfig;
import javax.microedition.khronos.opengles.GL10;

public class CubeRenderer implements android.opengl.GLSurfaceView.Renderer
{
    private float red = 0;
    private float green = 0;
    private float blue = 0;
    private boolean mTranslucentBackground;
    private Cube mCube;
    private float mAngle;

 public CubeRenderer(boolean useTranslucentBackground) {
        mTranslucentBackground = useTranslucentBackground;
        mCube = new Cube();
    }

 @Override
 public void onDrawFrame(GL10 gl) {

          /*
         * Usually, the first thing one might want to do is to clear
         * the screen. The most efficient way of doing this is to use
         * glClear().
         */
         gl.glClearColor(red, green, blue, 1.0f);
        gl.glClear(GL10.GL_COLOR_BUFFER_BIT | GL10.GL_DEPTH_BUFFER_BIT);

        /*
         * Now we're ready to draw some 3D objects
         */
        gl.glEnableClientState(GL10.GL_VERTEX_ARRAY);
        gl.glEnableClientState(GL10.GL_COLOR_ARRAY);


        gl.glMatrixMode(GL10.GL_MODELVIEW);
        gl.glLoadIdentity();

        gl.glPushMatrix();
        gl.glTranslatef(-4.0f, 1.5f, -4.0f);
        gl.glRotatef(mAngle,        0, 1, 0);
        gl.glRotatef(mAngle*0.25f,  1, 0, 0);


        mCube.draw(gl);
        gl.glPopMatrix();


        gl.glPushMatrix();

        gl.glTranslatef(-1.0f, 0, -5.0f);//(0.5f, 0.5f, 0.5f);
        gl.glRotatef(mAngle*2.0f, 0, 1, 1);
        mCube.draw(gl);
        gl.glPopMatrix();

        gl.glPushMatrix();
        gl.glTranslatef(2.0f, -1, -7.0f);//(0.5f, 0.5f, 0.5f);
        gl.glRotatef(mAngle*2.0f, 1, 0, 1);
        mCube.draw(gl);
        gl.glPopMatrix();

        gl.glPushMatrix();
        gl.glTranslatef(7.0f, -3, -9.0f);//(0.5f, 0.5f, 0.5f);
        gl.glRotatef(mAngle*2.0f, 1, 1, 0);
        mCube.draw(gl);
        gl.glPopMatrix();

        gl.glPushMatrix();
        gl.glTranslatef(12.0f, -5, -10.0f);//(0.5f, 0.5f, 0.5f);
        gl.glRotatef(mAngle*2.0f, 1, 0, 1);
        mCube.draw(gl);
        gl.glPopMatrix();

        mAngle += 1.2f;
 }

 @Override
 public void onSurfaceChanged(GL10 gl, int width, int height) {

  gl.glViewport(0, 0, width, height);

        /*
         * Set our projection matrix. This doesn't have to be done
         * each time we draw, but usually a new projection needs to
         * be set when the viewport is resized.
         */

        float ratio = (float) width / height;
        gl.glMatrixMode(GL10.GL_PROJECTION);
        gl.glLoadIdentity();
        gl.glFrustumf(-ratio, ratio, -1, 1, 1, 10);

 }

 @Override
 public void onSurfaceCreated(GL10 gl, EGLConfig config) {


        gl.glDisable(GL10.GL_DITHER);

         gl.glHint(GL10.GL_PERSPECTIVE_CORRECTION_HINT,
                 GL10.GL_FASTEST);

         if (mTranslucentBackground) {
             gl.glClearColor(0,0,0,0);
         } else {
             gl.glClearColor(1,1,1,1);
         }
         gl.glEnable(GL10.GL_CULL_FACE);
         gl.glShadeModel(GL10.GL_SMOOTH);
         gl.glEnable(GL10.GL_DEPTH_TEST);
 }

 public void setColor(float r, float g, float b){
          red = r;
          green = g;
          blue = b;
     }

}
import java.nio.ByteBuffer;
import java.nio.ByteOrder;
import java.nio.IntBuffer;
import java.nio.FloatBuffer;

import javax.microedition.khronos.opengles.GL10;

public class Cube {

    private IntBuffer   mVertexBuffer;
    private FloatBuffer   mColorBuffer;
    private ByteBuffer  mIndexBuffer;

 public Cube()
    {
        int one = 65536;//0x10000,有趣的技巧,呵呵
        int vertices[] = {
                -one, -one, -one,
                one, -one, -one,
                one,  one, -one,
                -one,  one, -one,
                -one, -one,  one,
                one, -one,  one,
                one,  one,  one,
                -one,  one,  one,
        };


        float colors[] = {
                0,    0,    0,  1,
                1,    0,    0,  1,
                1,    1,    0,  1,
                0,    1,    0,  1,
                0,    0,    1,  1,
                1,    0,    1,  1,
                1,    1,    1,  1,
                0,    1,    1,  1,
        };

        byte indices[] = {
                0, 4, 5,    0, 5, 1,
                1, 5, 6,    1, 6, 2,
                2, 6, 7,    2, 7, 3,
                3, 7, 4,    3, 4, 0,
                4, 7, 6,    4, 6, 5,
                3, 0, 1,    3, 1, 2
        };


        ByteBuffer vbb = ByteBuffer.allocateDirect(vertices.length*4);
        vbb.order(ByteOrder.nativeOrder());
        mVertexBuffer = vbb.asIntBuffer();
        mVertexBuffer.put(vertices);
        mVertexBuffer.position(0);

        ByteBuffer cbb = ByteBuffer.allocateDirect(colors.length*4);
        cbb.order(ByteOrder.nativeOrder());
        mColorBuffer = cbb.asFloatBuffer();
        mColorBuffer.put(colors);
        mColorBuffer.position(0);

        mIndexBuffer = ByteBuffer.allocateDirect(indices.length);
        mIndexBuffer.put(indices);
        mIndexBuffer.position(0);
    }

    public void draw(GL10 gl)
    {
        gl.glFrontFace(gl.GL_CW);
        gl.glVertexPointer(3, gl.GL_FIXED, 0, mVertexBuffer);
        gl.glColorPointer(4, gl.GL_FIXED, 0, mColorBuffer);
        gl.glDrawElements(gl.GL_TRIANGLES, 36, gl.GL_UNSIGNED_BYTE, mIndexBuffer);
    }

}
Android內建的臉孔辨識API還蠻好玩的,Jimmy' papa看到許多網友運用DetectFace API寫了許多有趣的APP,就想到每次帶Jimmy出去玩拍照時,這小子任憑媽媽怎麼說就是不肯擺出笑臉,我心裡就在想"這時候有海棉寶寶的笑笑直接塞到嘴巴多好啊!!!",於是小改一下別人的範例,直接就在人臉上貼上笑嘴,嘿嘿,呈現的效果還蠻有趣的
底下是幫愛因斯坦裝上笑笑的測試,嘿嘿,不管是嚴肅的沉思的或吐舌頭的愛因斯坦,都可以有笑笑假牙讓他露齒而笑,不過我的XOOM平板電腦攝影時不能移動太快,否則笑笑會跟不上而露餡
